


This article will cover various ways to install and use Stable Diffusion locally on Windows.
The best thing about Stable Diffusion, the free and open source text to-image AI model is that one can install and run it locally on own computer without being dependent on using another company’s online Application like with OpenAI DALL-E
We will cover ways to install and run GUI-based Stable Diffusion locally on Windows as well as through the command line.
Table of Contents
Install Stable Diffusion locally on Windows
Whether you use the command line or GUI for generating images from text via Stable Diffusion, there are a few common steps you need to take.
These steps are essential and without them running successfully, you won’t be able to use Stable Diffusion locally on windows.
These steps require that have a GPU-equipped machine. If you don’t have one, use this method that doesn’t require GPU.
Also, you should be able to find your way around a command line program. Don’t worry, it doesn’t require any prior programming or coding experience.
Get the Stable Diffusion AI Weights
- Visit https://huggingface.co/ and create an account
- Visit https://huggingface.co/CompVis/stable-diffusion-v-1-4-original, scroll down and select “Authorize”
- Download the checkpoint: https://huggingface.co/CompVis/stable-diffusion-v-1-4-original/blob/main/sd-v1-4.ckpt
- Download Stable Diffusion: https://github.com/basujindal/stable-diffusion/archive/refs/heads/main.zip
- Unzip stable-diffusion-main.zip file to your preferred location and go to the stable-diffusion-main/models/ldm folder and make a new folder inside called stable-diffusion-v1
- Rename the downloaded sd-v1-4.ckpt to model.ckpt and move the file into the stable-diffusion-v1 folder
Install Python dependencies
- Go back to the start of the stable-diffusion-main folder and open environment.yaml using Notepad
- Scroll down to dependencies: and add the line – git so it looks like:
dependencies:
– git
– python=3.8.5
– pip=20.3 - Download Miniconda from here: https://repo.anaconda.com/miniconda/Miniconda3-latest-Windows-x86_64.exe
- Run Miniconda3-latest-Windows-x86_64.exe and install it
- Open Anaconda Prompt (miniconda3)
- Type cd path to stable-diffusion-main folder, so if you have it saved in Documents you would type cd Documents/stable-diffusion-main
- Run the command conda env create -f environment.yaml (you only need to do this step for the first time, otherwise skip it)
- Wait for it to process
- Run conda activate ldm
Run Stable Diffusion locally on Windows
Launch Stable Diffusion Web GUI to generate images
Going forward you just need to repeat the steps in this section to start generating AI images using GUI Stable Diffusion locally on windows
- Run command python optimizedSD/txt2img_gradio.py
- Enter the IP address shown in the command window (it will start with 127.0.0.1) into your address bar in your web browser and there is your GUI to create images!
Using the command line version of Stable Diffusion
- Now you may create prompts using python scripts/txt2img.py –prompt “insert prompt“!
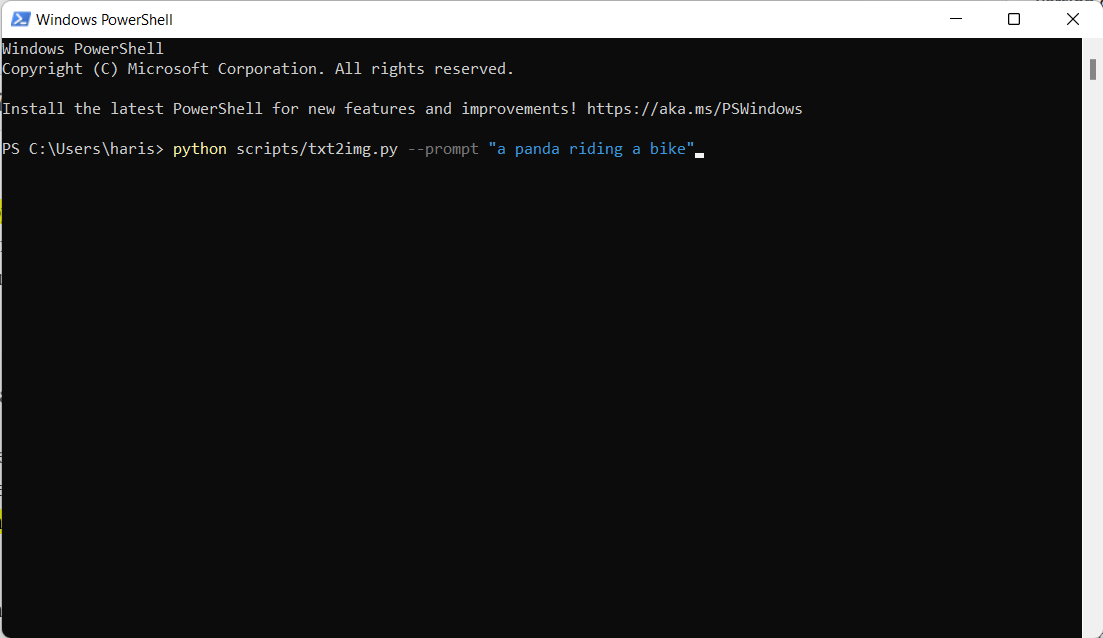
NOTE: If you are receiving CUDA out-of-memory errors, use python optimizedSD/optimized_txt2img.py instead of scripts/txt2img.py!
- Your images are saved to stable-diffusion-main/outputs/txt2img-samples/<prompt name> by default, you may change it by using –outdir directory_name to change it